Deploying Backup Application
In this section we will implement Kasten K10 as a backup and restore management applicaion.
Backup and Restore Architecture
At the very high level, implementing backup, restore and DR involves the following components:
- Source - applications hosted on OCP cluster
- Processing/management - Kasten K10 application
- Destination - Nutanix Objects as a backup location
We will also be implement Nutanix HCI snapshots to facilitate quiescing of worloads to back them up. This will be done using VolumeSnapshotClass kubernetes object in this lab.
| Concept | Storage Location | RTO/RPO |
|---|---|---|
| Backup (Snapshots) | Nutanix HCI Cluster (along with Storage container) | High |
| Exports | Nutanix Objects S3 (stored in backup target) | Medium |
Potential Architectures
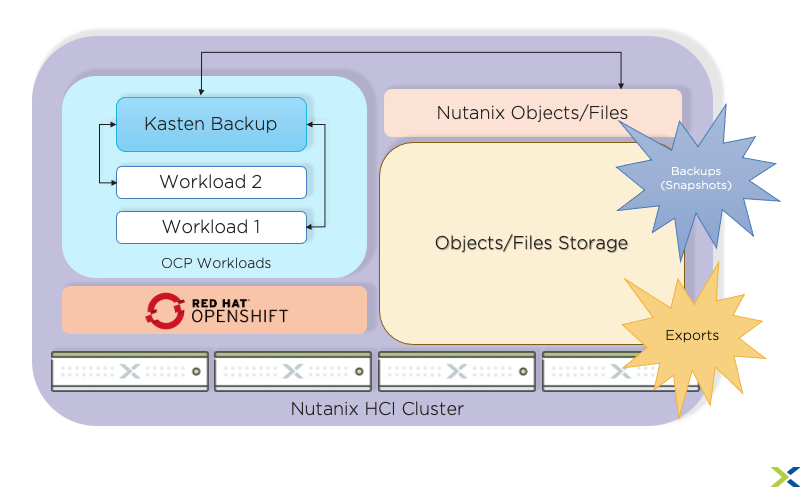
Architecture 1 - All in one cluster (applications, backup application and backup destination)
- Workload snapshots and backup exports are stored in the same Nutanix HCI cluster
- Snapshots are provided by Nutanix DFS
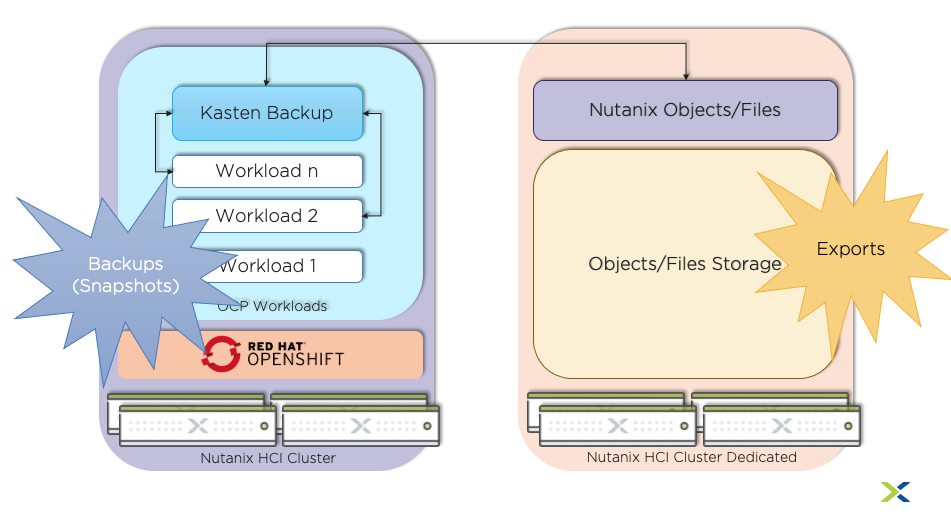
Architecture 2 - Source in one cluster (applications, backup application)
- Workload snapshot location is the source Nutanix HCI cluster
- Snapshots are provided by Nutanix DFS
- Backup export location in the Objects/Files cluster
In this lab, we will be implementing Architecture 1 with all components in a single cluster.
Installing VolumeSnapshotClass
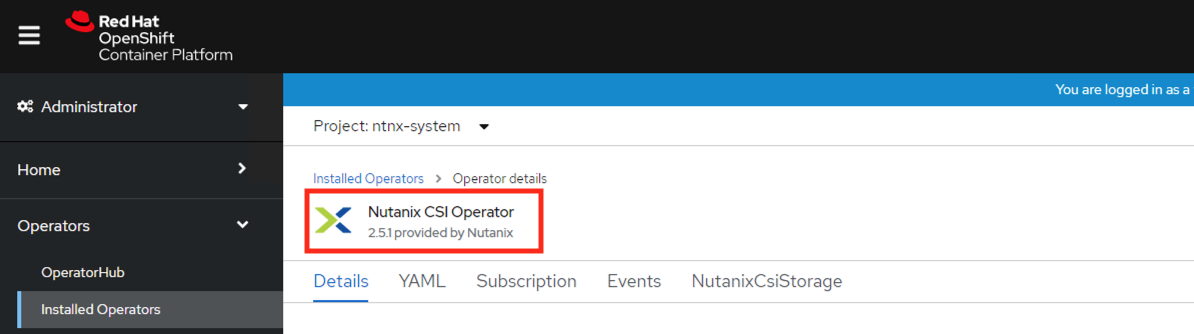
Before you proceed with this section, verify that Nutanix CSI operator version and make sure it is at least 2.5.1 - we need this version to be able to implement volumesnapshotclass
We will start by creating a VolumeSnapshotClass kubernetes object with Nutanix CSI. This helps in facilitating snapshots of the source workload.
Logon to your UserXX-LinuxToolsVM on the browser using VSCode-server
Export the OCP cluster's KUBECONFIG file to environment so we can perform
occommandsexport KUBECONFIG=/home/ubuntu/xyz/auth/kubeconfigCreate the
VolumeSnapshotClasscat << EOF | oc create -f -
apiVersion: snapshot.storage.k8s.io/v1
kind: VolumeSnapshotClass
metadata:
name: acs-abs-snapshot-class
annotations:
k10.kasten.io/is-snapshot-class: "true" # << Note the annotation to let kasten k10 use this volumesnapshotclass
driver: csi.nutanix.com
parameters:
storageType: NutanixVolumes
csi.storage.k8s.io/snapshotter-secret-name: ntnx-pe-secret
csi.storage.k8s.io/snapshotter-secret-namespace: openshift-cluster-csi-drivers
deletionPolicy: Delete
EOFRun the following script to check if your OCP cluster is Kasten K10 ready
# Add kasten helm repo
helm repo add kasten https://charts.kasten.io/
# Run kasten pre-install check
curl https://docs.kasten.io/downloads/8.0.2/tools/k10_primer.sh | bash
You would notice output as following:
Validating Provisioners:
csi.nutanix.com:
  Is a CSI Provisioner  -  OK
  Storage Classes:
    nutanix-volume
      Valid Storage Class  -  OK
  Volume Snapshot Classes:
    acs-abs-snapshot-class
      Has k10.kasten.io/is-snapshot-class annotation set to true  -  OK
      Has deletionPolicy 'Delete'  -  OK

Validate Generic Volume Snapshot:
  Pod Created successfully  -  OK
  GVS Backup command executed successfully  -  OK
  Pod deleted successfully  -  OK

serviceaccount "k10-primer" deleted
clusterrolebinding.rbac.authorization.k8s.io "k10-primer" deleted
job.batch "k10primer" deleted
Make sure all pre-checks are OK. If not, go back and check the associated errors and resolve them. Ask your instructor for help.
cautionIf you see warnings about security context constraints, you can ignore them as we will fix them soon.
Installing Kasten K10
In this section we will install Kasten K10 in our OCP cluster to backup and restore of our OCP workload (wordpress in our case).
Kasten K10 can also be implemented using OCP Operator. However, at the time of writing this lab there were issues with the Operator approach. So we will use Helm based install.
Install K10 using helm
Helm is pre-installed in your LB_DNS VM for your convenience.
# create a new ocp project to host kasten k10 applicaion
oc new-project kasten-io
helm install k10 kasten/k10 --namespace=kasten-io --set scc.create=true --set route.enabled=true --set route.path="/k10" --set auth.tokenAuth.enabled=trueYou will see output similar to the following:
NAME: k10
LAST DEPLOYED: Tue Mar  1 06:40:27 2022
NAMESPACE: kasten-io
STATUS: deployed
REVISION: 1
TEST SUITE: None
NOTES:
Thank you for installing Kasten’s K10 Data Management Platform!

Documentation can be found at https://docs.kasten.io/
Make sure all kasten k10 resources are deployed properly by running the following command:
oc get pods -n kasten-io -wOutput - Wait until all pods are running# This may take a few minutes
NAME READY STATUS RESTARTS AGE
aggregatedapis-svc-7874bdc658-hcvbh 1/1 Running 0 3m26s
auth-svc-7f6f89dcc9-tcrcz 1/1 Running 0 3m26s
catalog-svc-5c65cc87c7-bq7c8 2/2 Running 0 3m25s
config-svc-6568f6cf-d9h8c 1/1 Running 0 3m26s
crypto-svc-6f6bcf669b-72vr7 3/3 Running 0 3m26s
dashboardbff-svc-7d69c79b85-q55rd 1/1 Running 0 3m26s
executor-svc-69c8c779cc-5r5r6 2/2 Running 0 3m26s
executor-svc-69c8c779cc-mccxp 2/2 Running 0 3m25s
executor-svc-69c8c779cc-tpx7w 2/2 Running 0 3m25s
frontend-svc-5cfdc5dc57-sxsqn 1/1 Running 0 3m25s
gateway-74b76b57d-7flsm 1/1 Running 0 3m26s
jobs-svc-6c77c5d887-pwnt5 1/1 Running 0 3m25s
k10-grafana-8684cdd9c-jbjtc 1/1 Running 0 3m25s
kanister-svc-74f76676c5-27t56 1/1 Running 0 3m25s
logging-svc-7b84756c64-226rz 1/1 Running 0 3m25s
metering-svc-5c77f69d74-b4fw4 1/1 Running 0 3m25s
prometheus-server-85dff88779-j4rrq 2/2 Running 0 3m25s
state-svc-84589d9df9-wkdll 2/2 Running 0 3m25sLook for the route where you can access Kasten Web UI
oc get route -n kasten-ioOutputNAME HOST/PORT PATH SERVICES PORT TERMINATION WILDCARD
k10-route k10-route-kasten-io.apps.ocp1.ntnxlab.local /k10/ gateway http NoneMake the URL by appending the path to the HOST shown in the command above
# URL + PATH
# Example below
# Your URL will be almost the same. Verify to make sure- Template URL
- Sample URL
http://k10-route-kasten-io.apps.<your-ocp-cluster>.ntnxlab.local/k10/#http://k10-route-kasten-io.apps.ocpuser01.ntnxlab.local/k10/#If the above URL doesn't work, try this one
- Template URL
- Sample URL
http://k10-route-kasten-io.apps.<your-ocp-cluster>.ntnxlab.local/k10/http://k10-route-kasten-io.apps.ocpuser01.ntnxlab.local/k10/Add to the hosts file entry on your Mac/PC for accessing OCP UI with the following content:
- Template Hosts File
- Example Hosts File
10.x.x.x       pc.ntnxlab.local
10.x.x.x       console-openshift-console.apps.ocpuser0X.ntnxlab.local
10.x.x.x       oauth-openshift.apps.ocpuser0X.ntnxlab.local
10.x.x.x k10-route-kasten-io.apps.ocpuser04.ntnxlab.local10.42.18.7 pc.ntnxlab.local
10.38.18.220 console-openshift-console.apps.ocpuser01.ntnxlab.local
10.38.18.220 oauth-openshift.apps.ocpuser01.ntnxlab.local
10.38.18.220 k10-route-kasten-io.apps.ocpuser04.ntnxlab.localCopy the URL and paste in a browser in your Mac/PC
You will get a login page, to get the credentials, return to the shell and run the following commands:
Kasten K10 gives admin privileges to dashboardbff-svc service account during deployment.
This service account will have two secrets.
We need to find the secret starting with dashboardbff-svc- and find the token value by decoding it.
Run the following commands to get this:
oc --namespace kasten-io create token dashboardbff-svc --duration=48h# Sample output shown here - your token will be different
eyJhbGciOiJSUzI1NiIsIm.....
# Copy the token from your ssh console and paste in the Kasten login UIinfoYou can also create a permanent token that doesn't expire. See Kasten documentation for more details.
Return to the broswer and paste the secret value

Click on Sign In
noteYou may be asked to enter your company email ID and company name before you can see the Kasten K10 administration page. Please do so if necesary.
Setup up Backup Target
We will create a backup target to point to our bucket we created in the previous section. In Kasten this is called Location Profiles.
In Kasten dashboard click on Profiles > Location > + New Profile
Enter the following details
- Profile Name - ntnx-objects
- Cloud Storage Provider - S3 Compatible
- S3 Access Key - Access key from the file you downloaded in the previous section
- S3 Secret Key - Secret key from the file you downloaded in the previous section
- Endpoint -
https://ntnx-objects.ntnxlab.local(pulic URL/IP address of the Object's store endpoint) - Skip certificate chain and hostname verification - Checked and confirm to Disable SSL Verify in the prompt
- Region - us-east-1
- Bucket Name - Initials-k10 (e.g. ocpuser01-k10)
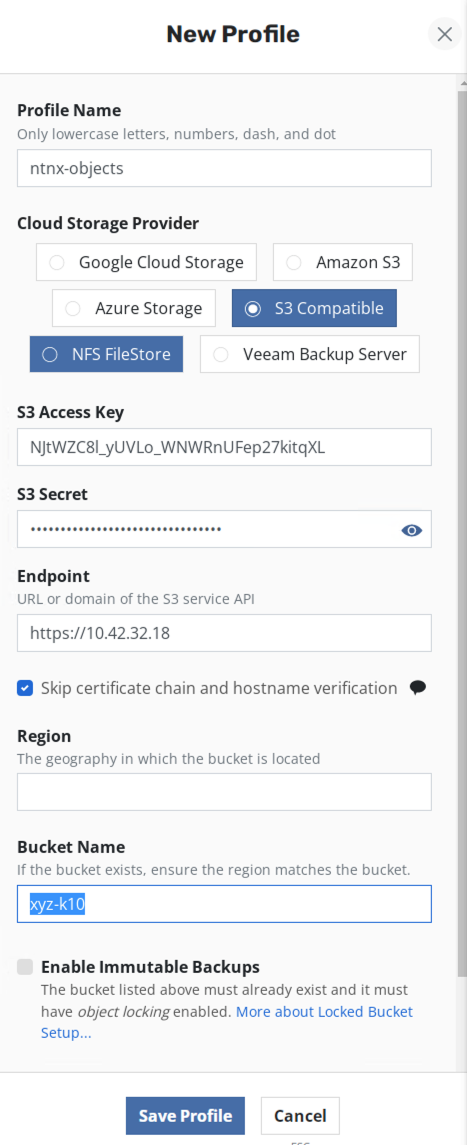
Click on Save
Kasten will do a verification and the profile will be available in the Settings > Locations page
noteIf there are verification errors, please go back to checking all the input parameters for creating location profile
You have successfully setup Kasten backup application to backup your application.