Linux Tools VM
Overview
This Ubuntu VM image will be staged with packages used to support multiple lab exercises.
Deploy this VM on your assigned cluster if directed to do so as part of Lab Setup.
Upload Linux Tools VM Image
Check if ubuntu 24.04 image exists first before deploying.
If you are in a lab environment, only one participant needs to add this.
In Prism Central > Select Compute and Storage > Images
Click on Add Image
Select the URL radio button and paste the following image URL
https://cloud-images.ubuntu.com/releases/24.04/release/ubuntu-24.04-server-cloudimg-amd64.imgClick on Upload File and in the description add your Initials
Click on Next and select Place Image Directly on cluster
Click on Save
Deploying Linux Tools VM
Only deploy the VM once with a username (see Lookup tool) in the VM name.
In Prism Central > select Menu > Compute and Storage > VMs, and click Create VM
Fill out the following fields:
- Name - ocpuserXX-Linux-ToolsVM
- Description - (Optional) Description for your VM.
- Number of VMs - 1
- CPU(s) - 6
- Number of Cores per CPU - 1
- Memory - 8 GiB
Click Next
Under Disks select Attach Disk
- Type - DISK
- Operation - Clone from Image
- Image -
ubuntu-24.04-server-cloudimg-amd64.img - Capacity - 100 GiB
- Bus Type - leave at default SCSI Setting
Click Save
Under Networks select Attach to Subnet
- VLAN Name - primary-XXX-XXXX
- Network Connection State - Connected
- Assignment Type - Assign with DHCP
Click Save
Click Next at the bottom
In Management section
Categories - leave blank
Timezone - leave at default UTC
Guest Customization -
Script Type - Cloud-init (Linux)
Configuration Method - Custom Script
You will need to create ssh key-pair to use in the cloud-init yaml content (script)
Do you need to create a SSH key pair?
Execute the following commands in a terminal you are in a Linux / Mac environment to generate a private key.Use PowerShell in windows environments.
ssh-keygen -t rsa -b 2048 -C "Created for Linux Tools VM"

# follow prompts
# do not specify passphrase
# once completed run the following command

cat id_rsa.pub

# copy the contents of the id_rsa.pub file to your cloudinit yaml file
Paste the following script in the script window once you have access to your ssh key-pair.
Remember to change to your hostname ocpuserXX-LinuxToolsVM#cloud-config
hostname: ocpuserXX-LinuxToolsVM # << Change to your user name >>
package_update: true
package_upgrade: true
package_reboot_if_required: true
packages:
- open-iscsi
- nfs-common
- git
- jq
- bind-utils
- nmap
- docker.io
users:
- default
- name: ubuntu
groups: sudo
shell: /bin/bash
sudo:
- 'ALL=(ALL) NOPASSWD:ALL'
ssh-authorized-keys:
- ssh-rsa AAAAB3Nxxxxxxxx ... # << Paste your SSH public key >>
runcmd:
- systemctl stop ufw && systemctl disable ufw
- usermod -aG docker ubuntu
- 'curl -Lo /usr/local/bin/kubectl https://storage.googleapis.com/kubernetes-release/release/$(curl -s https://storage.googleapis.com/kubernetes-release/release/stable.txt)/bin/linux/amd64/kubectl'
- chmod +x /usr/local/bin/kubectl
- 'curl https://raw.githubusercontent.com/helm/helm/main/scripts/get-helm-3 | bash'
- 'su - ubuntu -c "curl -fsSL https://raw.githubusercontent.com/ariesbabu/ocp-gitp/refs/heads/main/docs/toolsvms/install_vscode_tools.sh | bash"'
- eject
- reboot
Click on Next
Click Create VM at the bottom
Go back to Prism Central > Menu > Compute and Storage > VMs
Select your ocpuserXX-Linux-ToolsVM
Under Actions drop-down menu, choose Power On
cautionIt may take up to 10 minutes for the VM to be ready. The VM will reboot once to finish the installation process.
You can watch the console of the VM from Prism Central to make sure all the cloudinit script has finished running.
Cloudinit logs are stored in /var/log/cloud-init.log
Logon to the tools VM using SSH
ssh -l ubuntu _your_jumphost_ip # Get the IP address of the jumphost VM from Prism UIMonitor the
cloudinitprocess logstail -f /var/log/cloud-init.logGet the IP address of the jumphost VM from Prism UI
Connect to you Jumpbox using VSCode
Connect to you Jumpbox using VSCode on Browser using Password
The code-server will take a few minutes to come online.
In you browser visit the following URL
- Template URL
- Example URL
https://_your_jumphost_iphttps://10.54.63.96Enter
_passwordas the passwordOpen the following file in VSCode Explorer window
/home/ubuntu/.config/code-server/config.yaml
Change the password to your desired password
bind-addr: 0.0.0.0:443  # Only bind to localhost
auth: password
password: _desired_password # Replace with a strong password
cert: true
Restart VSCode server daemon
sudo systemctl restart code-server@$USERcautionThis will take a minute or so
Connect to VSCode on the browser and login using the new password
VSCode Terminal
From now we will work on the browser to access VSCode environment and Terminal
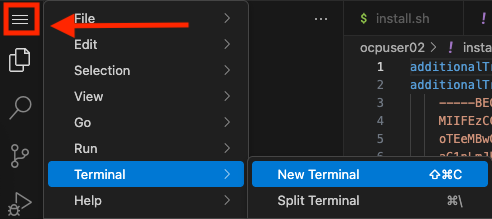
From VSCode hamburger menu
Choose Terminal > New Terminal
For best visibility, place the Terminal on the right instead of the bottom
Choose hamburger menu > View
Choose Appearance > Panel Position > Right as shown here
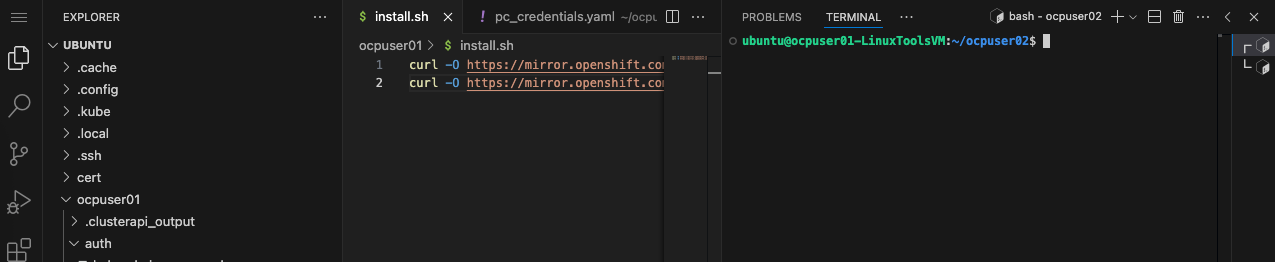
This setup allows to explore the files, edit it in VSCode editor and also execute commands.
Now the jumphost VM is ready with all the tools to deploy other sections on this site.