Provision Storage for Image Registry
OCP comes with a in-built container image registry. The advantages of these container image registry are the following:
From Red Hat - The registry is typically used as a publication target for images built on the cluster, as well as being a source of images for workloads running on the cluster. When a new image is pushed to the registry, the cluster is notified of the new image and other components can react to and consume the updated image.
- Integrates with OCP clusters authentication and authorization system
- Provides a image source local to the cluster for all running workloads
- Integrates with OCP clusters CICD workflows - for example when a new container images is uploaded to this registry, the cluster can update the image of all the running running contianers
- Registry can be easily scaled up or down
- Image data is stored in a cloud storage
Internal image registry should not be used as enterprise-wide image registry. For this use-case Quay is part of OpenShift OPP subscription. For disconnected scenarios there is a limited Quay-Version available: “mirror-registry”
Single OCP cluster is the typical scope of the OCP inbuilt registry.
There are two ways of provisioning Nutanix HCI based storage to OpenShift Image Registry:
- Using S3 compliant storage (recommended by Nutanix and RedHat)
- Presenting a CSI Volumes PVC (RWO)
We will look at both in this section. Nutanix CSI Volumes PVC is optional. Use one or the other for OCP Image registry.
Image Registry Storage using Nutanix S3 Bucket
In this section we will provision Nutanix Objects based S3 storage to serve as a storage for all OpenShift image registry containers.
Create a DNS Entry for Nutanix Objects Store
In this section we will add nutanix objects store's DNS records for lookup by OCP Image registry.
Logon to the AutoAD windows VM
- Username: administrator
- Password: your HPOC password
We will add the following entries to DNS server
Create DNS Entry If Not PresentUse your HPOC cluster Object's public IP only.
Create A record entry only if it is not present in DNS server.
The IP addresses in the following commands are used as an example. You should use IP address details that belong to your HPOC cluster's Object's public IP. For information on locating your cluster IP see Getting Started Networking section.
Open PowerShell as Administrator and create the two A records
Add the API A record for Objects IPAdd-DnsServerResourceRecordA -Name ntnx-objects -IPv4Address 10.38.18.221 -ZoneName ntnxlab.local -ZoneScope ntnxlab.localTest name resolution for added entries
nslookup ntnx-objects.ntnxlab.local
Server: dc.ntnxlab.local
Address: 10.38.18.203   # << This is the DNS server IP address

Name: ntnx-objects.ntnxlab.local
Address: 10.38.18.221   # << This is the ntnx-objects public IP address
Installing SSL Certificate on Objects
We will need to install SSL certificates on the pre-provisioned nutanix-objects store to be able to use it as a OCP registry storage and to avoid other security threats.
Only one person needs to do this section for generate and install SSL certificates for Objects Store.
If you are sharing a HPOC for multiple users, then you need to do this section only once. Decide with other participants sharing your cluster before proceeding.
If you are the certificate admin in the cluster you are sharing with other users, create and install the follwing SSL certificates on Objects store:
ntnx-objects.ntnxlab.local.pem
ntnx-objects.ntnxlab.local-key.pem
rootCA.crt
Logon to your
UserXX-LinuxToolsVMusing VSCode client or on the browserCreate public and private key certificates for
ntnx-objects.ntnxlab.localmkcert ntnx-objects.ntnxlab.local"Command outputmkcert ntnx-objects.ntnxlab.local
#
Created a new certificate valid for the following names 📜
- "ntnx-objects.ntnxlab.local"
The certificate is at "./ntnx-objects.ntnxlab.local.pem" and the key at "./ntnx-objects.ntnxlab.local-key.pem" ✅
It will expire on 30 August 2027catout the contents of certificate files and copy them to your Mac/PC workstation in separate filesCreate these files on Mac/PC
- On a Mac, use
viin Terminal orVSCode(if you already have it installed) - On Windows PC, use
NotepadorVSCode
- On a Mac, use
Go to Prism Central > Services > Objects
Select the
ntnxlabobject store and choose Manage FQDNs & SSL CertificatesClick on Replace SSL Certificate
Upload the following files:
- Private key -
ntnx-objects.ntnxlab.local-key.pem - Public Certificate -
ntnx-objects.ntnxlab.local.pem - CA Certificate/Chain -
rootCA.pem(This was created in the previous section during IPI pre-requisites preparation)
- Private key -
Under New FQDN, add
ntnx-objects.ntnxlab.localas an additional FQDNClick on Save
Generating Access Keys for S3 Bucket
Go to Prism Central > Objects
On the top menu, click on Access Keys
Click on + Add people
Select Add people not in a directory service
Enter a email (ocpuserXX@nutanix.com) and name (ocpuserXX)
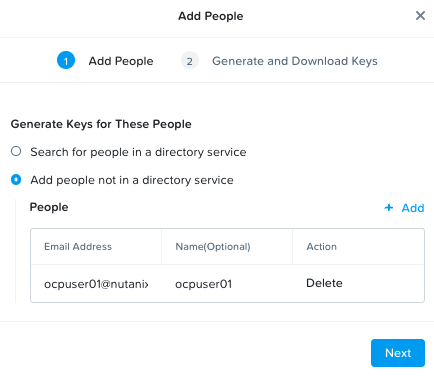
Click on Next
Click on Generate Keys
Once generated, click on Download Keys
Once downloaded, click on Close
Open the downloaded file to verify contents
Username: ocpuserXX@ntnxlab.com
Access Key: t1FzWhILj_CxU4NGNcWzZ0hW-xxxxxxx
Secret Key: KbGdgYMoaYx1DnIJ6gTgu-xxxxxxxxxx
Display Name: ocpuserXX
Tag: buckets-access-key-xxxxxxxxxxxxxxxxxxxx
Store the access key and secret key in a safe place for later
Create Buckets Storage for OCP Image Registry
We will create a bucket for backup destination
On the top menu, click on Object Stores
Click on ntnxlab (or other objects store) objects store, this will open objects store management page in a separate browser tab
Click on Create Bucket
Enter ocpuserXX-registry (E.g. ocpuser01-registry) as the bucket name
Click on Create
In the list of buckets, click on the ocpuserXX-registry (E.g. ocpuser01-registry) bucket
Click on User Access menu and Edit User Access
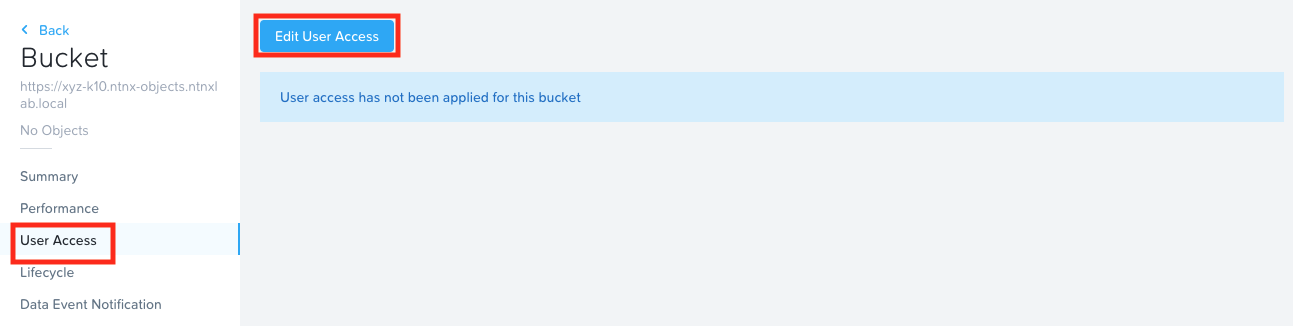
In the Share Bucket ocpuserXX-registry window, type in your email that you configured in User Access section
Give Full Access permissions
Click on Save
Create Kubernetes Resources to use Objects Store
We will need to create kubernetes resources to use the Objects store as the OCP registry store
Change to the directory where
rootCA.crtfile is present. (if not already there)Create a connection to your OCP cluster (if not already done so)
export KUBECONFIG=/home/ubuntu/ocpuserXX/auth/kubeconfigList the nodes in the cluster to make sure the connection is working
oc get nodesCreate a config map
oc create configmap object-ca --from-file=ca-bundle.crt=rootCA.pem -n openshift-configConfirm the config map with the
rootCA.crtcontents forproxy/clusterresourceoc -n openshift-config get cm user-ca-bundle -oyamlThis should match with the contents oc
rootCA.crtfileCreate a secret with the bucket access and secret key you generated in the previous section
- Template command
- Sample command
oc create secret generic image-registry-private-configuration-user \
  --from-literal=REGISTRY_STORAGE_S3_ACCESSKEY=<your-access-key> \
  --from-literal=REGISTRY_STORAGE_S3_SECRETKEY=<your-secret-key> \
  --namespace openshift-image-registry
oc create secret generic image-registry-private-configuration-user \
--from-literal=REGISTRY_STORAGE_S3_ACCESSKEY=ofYqh4g2ImLNuXm5JjqDrRtiDLKU8YAr \
--from-literal=REGISTRY_STORAGE_S3_SECRETKEY=jluOBDuENC7jeci7JiSH4tsB4uCHX0ST \
--namespace openshift-image-registryUpdate the image registry configuration to use the newly create nutanix objects S3 bucket
- Template command
- Sample command
oc patch configs.imageregistry.operator.openshift.io/cluster \
  --type='json' \
  --patch='[
{"op": "remove", "path": "/spec/storage" },
{"op": "add", "path": "/spec/storage", "value":
{"s3":
{"bucket": "ocpuserXX-registry",                        ### <<< REMEMBER TO USE YOUR BUCKET NAME
"regionEndpoint": "https://ntnx-objects.ntnxlab.local",
"encrypt": false,
"region": "us-east-1"}}}]'
oc patch configs.imageregistry.operator.openshift.io/cluster \
--type='json' \
--patch='[
{"op": "remove", "path": "/spec/storage" },
{"op": "add", "path": "/spec/storage", "value":
{"s3":
{"bucket": "ocpuser01-registry", ### <<< REMEMBER TO USE YOUR BUCKET NAME
"regionEndpoint": "https://ntnx-objects.ntnxlab.local",
"encrypt": false,
"region": "us-east-1"}}}]'Enable the image registry (by default image registry is disabled)
oc patch configs.imageregistry.operator.openshift.io cluster --type merge --patch '{"spec":{"managementState":"Managed"}}'You can use the config description to check if the image registry successfully connected to Nutanix Objects store's bucket
ocpuserXX-registryoc get config.imageregistry.operator.openshift.io/cluster -oyamlOutputkind: Config
spec:
httpSecret: xxxxxxxxxx
logLevel: Normal
## Snipped for brevity
s3:
bucket: ocpuserXX-registry ## << your Nutanix bucket for storing container images
region: us-east-1
regionEndpoint: https://ntnx-objects.ntnxlab.local ## << your Nutanix Object's URL
trustedCA:
name: ""
virtualHostedStyle: false
unsupportedConfigOverrides: null
## Snipped for brevity
status:
- lastTransitionTime: "2022-10-04T01:56:40Z"
reason: S3 Bucket Exists
status: "True"
type: StorageExists ## << your Nutanix bucket connection is successful
Verify Image Contents in S3 Bucket
We will install a simple application to verify if the local OCP image registry is able to store container images in the S3 bucket. Verification of our setup as we go helps us setup our workload on OCP cluster without running into issues.
Create a new project (namespace) in OCP cluster
oc new-project my-shared-storage
Create an app called new-app inside this project/namespace
oc new-app openshift/php https://github.com/christianh814/openshift-php-upload-demo --name=file-uploader
Wait for a few seconds to check the logs of the application
sleep 30s
oc logs -f file-uploader-1-buildTo verify the pods are running
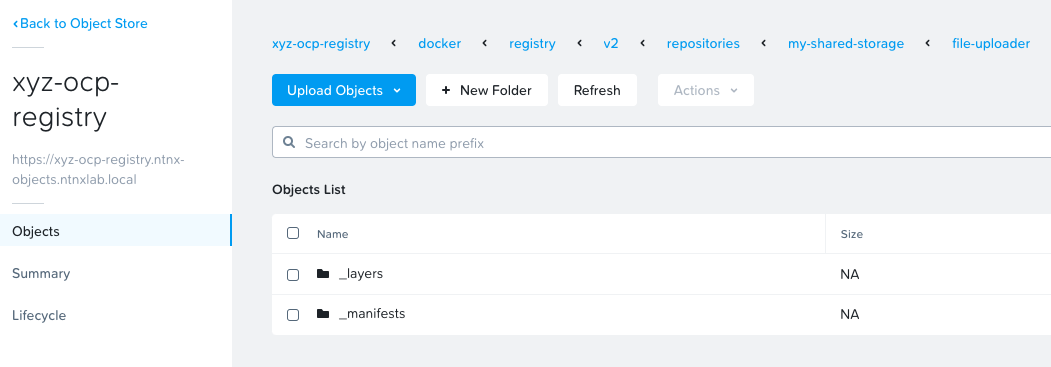
oc get podsTo verify if the images are present in the S3 bucket, Logon to your Prism Central and check the contents using Object's browser.
From Prism Central > Services > Objects
Click on
ntnx-objectobject store (this will open in a new tab)Select your
ocpuserXX-registryClick on Launch Objects Browser (this will open in a new tab)
Here you will be able to see the contents of the uploaded container image (you will have to drill down the directory structure to see this as shown below)