OCP CICD
Deployment Scenario
So far we have seen how to build and deploy an application using pipelines and serverless functionality. Now let us get into day-to-day life of a DevOps engineer or a Developer who needs to automate the following workflow.
- Build a container image from the source git repository
- Deploy the image into development environment
- If the deployment is successful, then tag the image as ready for staging
- Deploy the ready-for-staging to staging environment
Lucky for us, as we have the pipelines operator (implemented using Tekton), and serverless functionality using S2I, we can automate all this OCP and most other Kubernetes distribution (with a little know-how).
Build and Test in Development
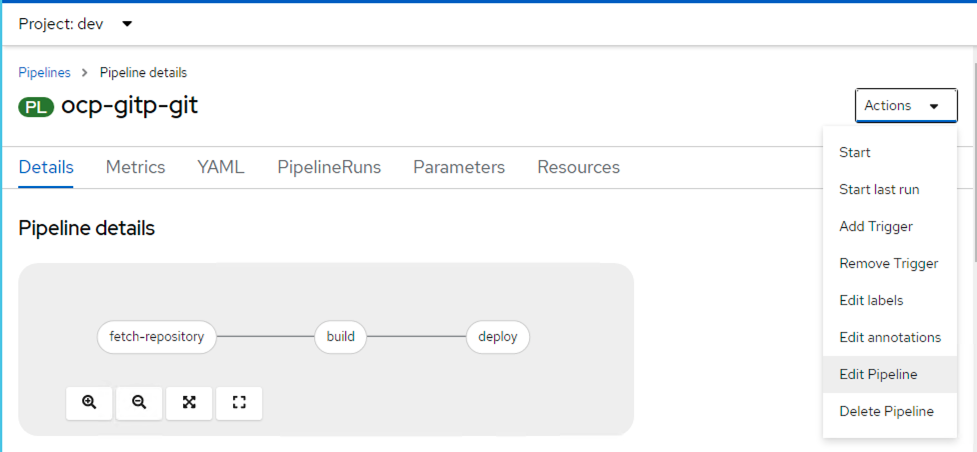
Let us extend our previously built ocp-gitp-git pipeline.
Browse to you OCP cluster's web UI
https://console-openshift-console.apps.ocpuserXX.ntnxlab.local/Login as kubeadmin or a IDP user
Switch to Developer view
Make sure you are under
devprojectClick on Pipelines option and then click on ocp-gitp-git pipeline
In the Actions menu, click on Edit Pipeline
Select the
deploystep and click on the+mark next to it, to add a sequential task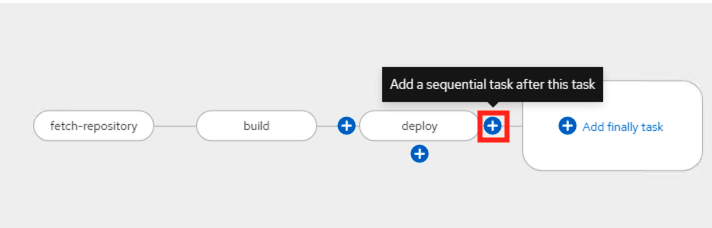
A new task will appear and join the pipeline
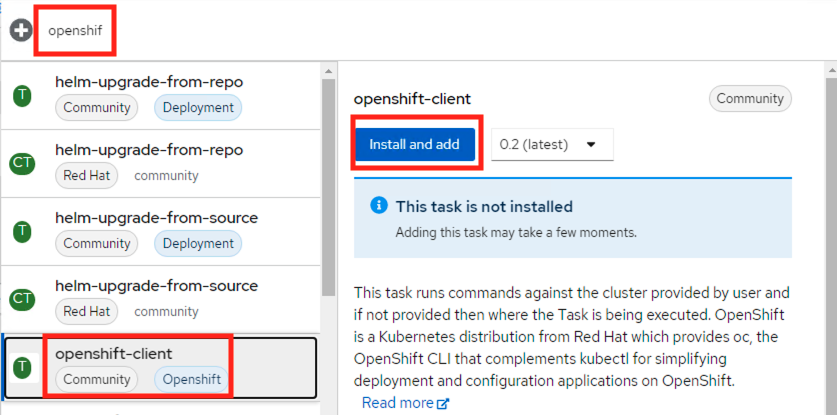
Click on the Add task and in the search text box type
openshiftSelect this, click on Add and install
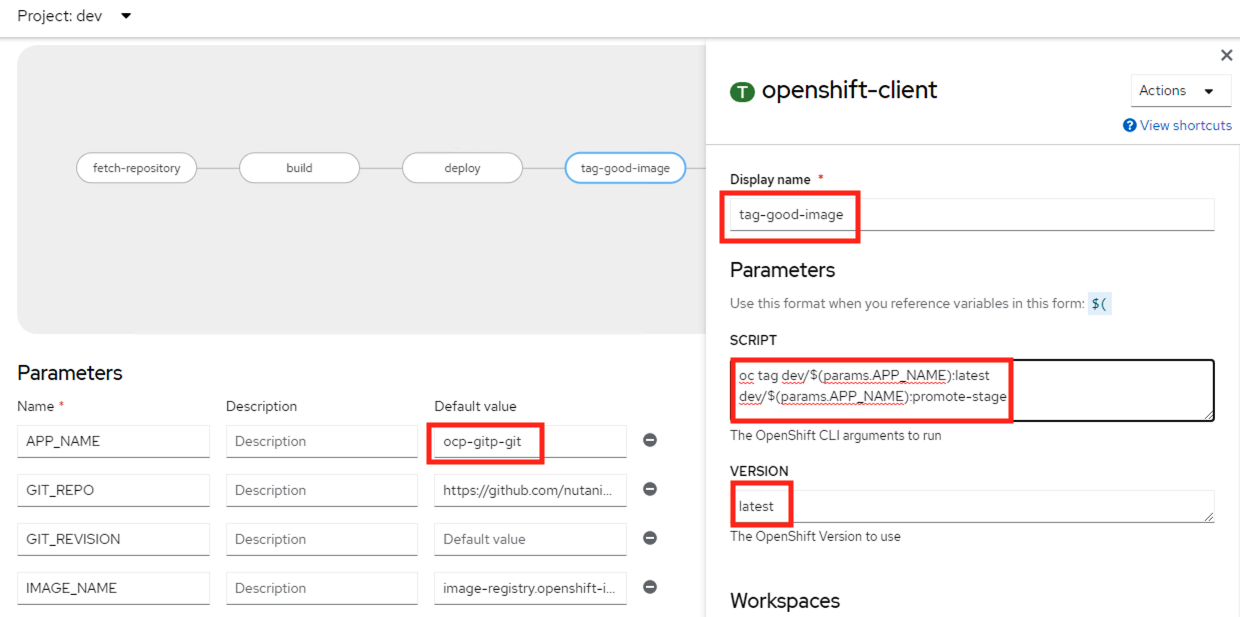
On the right-hand side the task property window will open
Enter the following fields:
Display name (for task) - tag-good-image
SCRIPT - copy and paste the following script
Paste this without alteringoc tag dev/$(params.APP_NAME):latest dev/$(params.APP_NAME):promote-stageVERSION - latest (we are configuring to use the latest version of
OCcommand)
 tip
tipWe will be using
$(PARAMS.APP_NAME)variable's value (populated from when you created the pipeline) as the APP_NAME as it keeps things uniform. You can think of various use cases for variables/parameters.
Deploy in Staging
Now that we have built and deployed image in development dev namespace. We can proceed to deploy in staging namespace.
We will do things a little different this time:
- Use the image that was successfully deployed in staging namespace and tagged to be promoted to staging
:promote-stage - Increase the number of replicas to 3 as number of users testing will also increase
Let's do this!
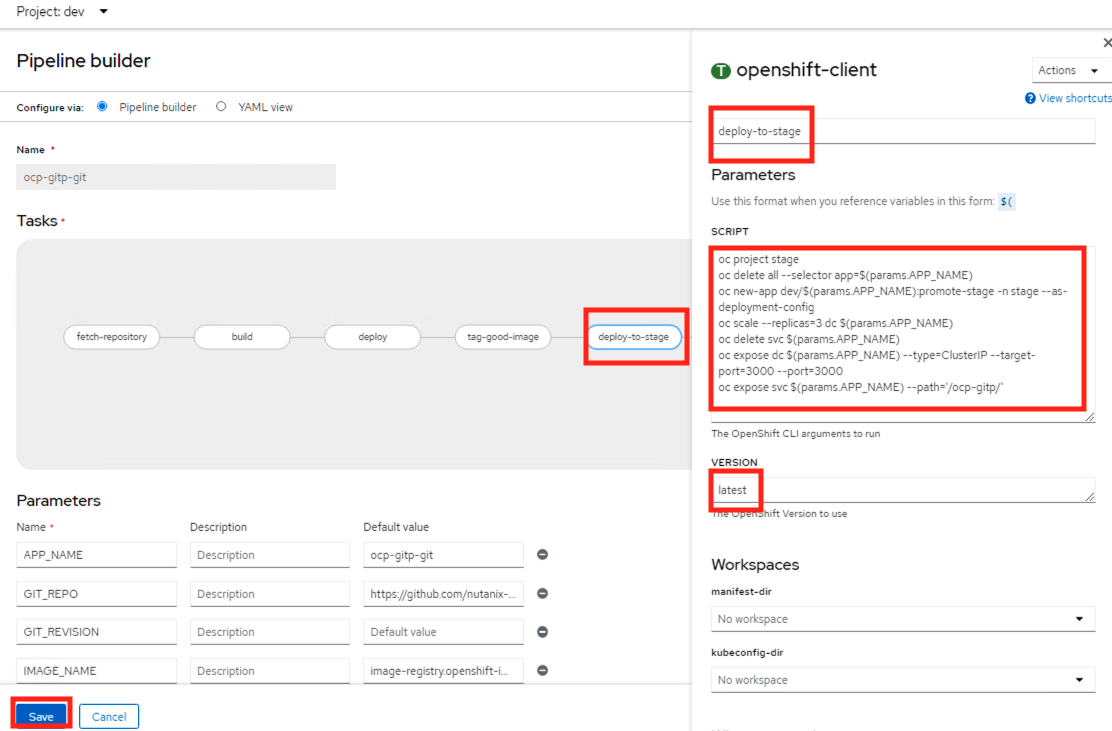
Follow the same steps as above to add another task and fill the following fields:
Display name (for task) - deploy-to-stage
SCRIPT - copy and paste the following script
Paste this without alteringoc project stage
oc delete all --selector app=$(params.APP_NAME)
oc new-app dev/$(params.APP_NAME):promote-stage -n stage --as-deployment-config
oc scale --replicas=3 dc $(params.APP_NAME)
oc delete svc $(params.APP_NAME)
oc expose dc $(params.APP_NAME) --type=ClusterIP --target-port=3000 --port=3000
oc expose svc $(params.APP_NAME) --path='/'VERSION - latest
Curious about Tekton pipeline?
If you would like to see a yaml view of the pipeline you just created:
- Select your
ocp-gitp-gitpipeline - Click on YAML tab
Note the params, tasks and workspacesapiVersion: tekton.dev/v1
kind: Pipeline
metadata:
creationTimestamp: '2025-05-27T05:58:03Z'
generation: 2
labels:
app.kubernetes.io/instance: ocp-gitp-git
app.kubernetes.io/name: ocp-gitp-git
operator.tekton.dev/operand-name: openshift-pipelines-addons
pipeline.openshift.io/runtime: nodejs
pipeline.openshift.io/runtime-version: 20-minimal-ubi8
pipeline.openshift.io/type: kubernetes
managedFields:
- apiVersion: tekton.dev/v1
fieldsType: FieldsV1
fieldsV1:
'f:metadata':
'f:labels':
.: {}
'f:app.kubernetes.io/instance': {}
'f:app.kubernetes.io/name': {}
'f:operator.tekton.dev/operand-name': {}
'f:pipeline.openshift.io/runtime': {}
'f:pipeline.openshift.io/runtime-version': {}
'f:pipeline.openshift.io/type': {}
'f:spec':
.: {}
'f:finally': {}
'f:params': {}
'f:tasks': {}
'f:workspaces': {}
manager: Mozilla
operation: Update
time: '2025-05-27T06:39:08Z'
name: ocp-gitp-git
namespace: dev
resourceVersion: '347269'
uid: 9e12fac5-19fa-4a13-be7c-93505503a3f5
spec:
params:
- default: ocp-gitp-git
name: APP_NAME
type: string
- default: 'https://github.com/ariesbabu/ocp-gitp.git'
name: GIT_REPO
type: string
- name: GIT_REVISION
type: string
- default: 'image-registry.openshift-image-registry.svc:5000/dev/ocp-gitp-git'
name: IMAGE_NAME
type: string
- default: .
name: PATH_CONTEXT
type: string
- default: 20-minimal-ubi8
name: VERSION
type: string
tasks:
- name: fetch-repository
params:
- name: URL
value: $(params.GIT_REPO)
- name: REVISION
value: $(params.GIT_REVISION)
- name: SUBDIRECTORY
value: ''
- name: DELETE_EXISTING
value: 'true'
taskRef:
params:
- name: kind
value: task
- name: name
value: git-clone
- name: namespace
value: openshift-pipelines
resolver: cluster
workspaces:
- name: output
workspace: workspace
- name: build
params:
- name: IMAGE
value: $(params.IMAGE_NAME)
- name: TLS_VERIFY
value: 'false'
- name: CONTEXT
value: $(params.PATH_CONTEXT)
- name: VERSION
value: $(params.VERSION)
runAfter:
- fetch-repository
taskRef:
params:
- name: kind
value: task
- name: name
value: s2i-nodejs
- name: namespace
value: openshift-pipelines
resolver: cluster
workspaces:
- name: source
workspace: workspace
- name: deploy
params:
- name: SCRIPT
value: oc rollout status deploy/$(params.APP_NAME)
runAfter:
- build
taskRef:
params:
- name: kind
value: task
- name: name
value: openshift-client
- name: namespace
value: openshift-pipelines
resolver: cluster
- name: tag-good-name
params:
- name: SCRIPT
value: 'oc tag dev/$(params.APP_NAME):latest dev/$(params.APP_NAME):promote-stage'
- name: VERSION
value: latest
runAfter:
- deploy
taskRef:
kind: Task
name: openshift-client
- name: deploy-to-stage
params:
- name: SCRIPT
value: |-
oc project stage
oc delete all --selector app=$(params.APP_NAME)
oc new-app dev/$(params.APP_NAME):promote-stage -n stage --as-deployment-config
oc scale --replicas=3 dc $(params.APP_NAME)
oc delete svc $(params.APP_NAME)
oc expose dc $(params.APP_NAME) --type=ClusterIP --target-port=3000 --port=3000
oc expose svc $(params.APP_NAME) --path='/'
- name: VERSION
value: '4.7'
runAfter:
- tag-good-name
taskRef:
kind: Task
name: openshift-client
workspaces:
- name: workspaceClick on Save
Go to Actions menu, and click on Start
Type
mainas git revision if promptedMonitor the run in the PipelineRuns tab, and you should be able to monitor the pipeline run
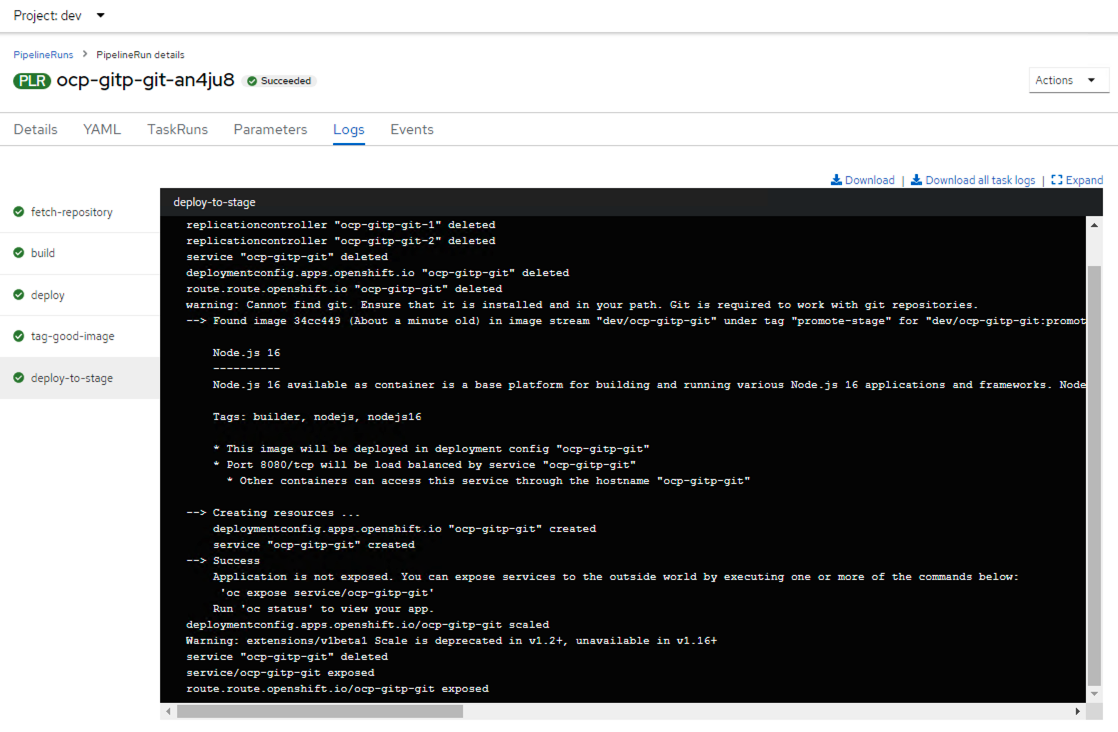
Make sure the pipeline run is successful, if there issues, troubleshoot and fix before moving on.
Optional - Using
occommand line, run the following commands to confirm the presence of resources in stage namespace/project- Command
- Command and output
oc get all -n stageoc get all -n stage
#
NAME READY STATUS RESTARTS AGE
pod/ocp-gitp-git-1-929g7 1/1 Running 0 90m
pod/ocp-gitp-git-1-deploy 0/1 Completed 0 90m
pod/ocp-gitp-git-1-gp478 1/1 Running 0 90m
pod/ocp-gitp-git-1-wmq88 1/1 Running 0 90m
NAME DESIRED CURRENT READY AGE
replicationcontroller/ocp-gitp-git-1 3 3 3 90m
NAME TYPE CLUSTER-IP EXTERNAL-IP PORT(S) AGE
service/ocp-gitp-git ClusterIP 172.30.165.192 <none> 3000/TCP 90m
NAME REVISION DESIRED CURRENT TRIGGERED BY
deploymentconfig.apps.openshift.io/ocp-gitp-git 1 3 3 config,image(ocp-gitp-git:promote-stage)
NAME HOST/PORT PATH SERVICES PORT TERMINATION WILDCARD
route.route.openshift.io/ocp-gitp-git ocp-gitp-git-stage.apps.ocp-cluster.ntnxlab.local /ocp-gitp/ ocp-gitp-git 3000 NoneClick on Topology option, and click on the URL on your application as shown here, this is a route created by the pipeline for application access
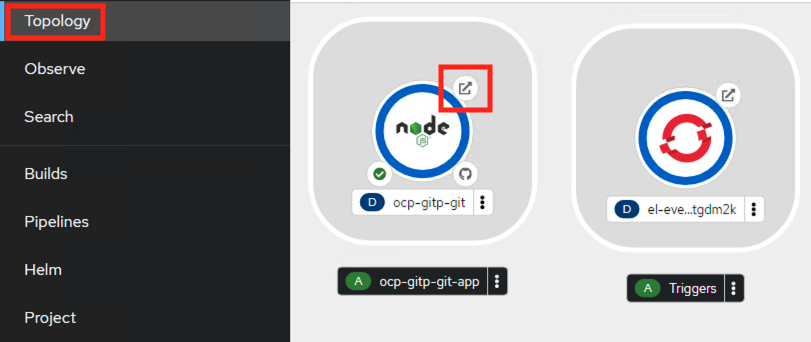
The application should open in a new browser tab
 note
noteNote that the documentation site NodeJS application is now hosted on your OCP cluster
http://ocp-gitp-git-stage.apps.user02.ntnxlab.local/Where:
ocp-gitp-git- is your application namestage- is your namespace/project nameocpuser02- is your OCP clusterntnxlab.local- is your domain/ocp-gitp/- is your basePath url
You can note how easy it is build pipelines to automate your deployments using serverless and CICD.