OCP: Assisted Installation
In this optional lab we will go through Assisted Installation feature that Red Hat Console offers.
Assisted Installer is a GUI driven way of deploying OCP clusters.
You would use Assisted Installer clusters for to deploy OCP clusters quickly (e.g. before a POC) and for personal testing purposes.
Single node OCP cluster implementation is also available with Assisted Installer. We will only look at deploying multi-node clusters in this lab.
Estimated time to complete this lab is 60 minutes.
If you are doing this section of the lab using a Single Node HPOC (SPOC) there will not be enough resources to deploy a second OCP cluster.
Remove existing OCP clusters that you don't require anymore.
If you were using NCM (Calm) - Please delete the other OCP cluster(s) from Calm > Actions > Delete before proceeding with this lab.
Pre-requisites for Assisted Installation
- Administrator finds and reserves API and Ingress IP addresses for OCP cluster
- Administrator creates the OCP Master and Worker VMs
- Adminsitrator provisions compute, networking and storage associated with the OCP Master and Worker VMs
- Access to Red Hat Console to use Assisted Installer and install a OCP cluster
High Level Overview of Assisted Installation
Assisted Installer does the following:
- Provides RHCOS and OCP installation binaries in a CD-ROM ISO file
- Once the OCP VMs (Master and Worker) nodes are booted with this CD-ROM ISO file, using the public key the VMs connect to Red Hat Console
- VMs show in Assisted Installer page and the administrator (you) begins the installation
- Red Hat Console will manage and monitor the installation process from start to end
- Upon successfull installatino of a OCP cluster the following will be
provided:
- KUBECONFIG file for
ocaccess - DNS entries for OCP Cluster Manager access
- KUBECONFIG file for
- Assisted installer will choose one of the Master VMs to serve the Bootstrap role
Assisted Installers in GA as of July 2022 General Availability .
The OCP clusters deployed using Assisted Installers can be used for production, testing and development purposes owing to pre-requisites conformity.
At a very high level, we will accomplish the following to get a OCP cluster deployed using Assisted Installer:
- Find and reserve two IPs in our AHV network for OCP cluster's API and Ingress endpoints
- Provision OCP Cluster in Red Hat Console and Generate CD-ROM ISO URL
- Provision OCP Infrastructure - Create Master and Worker VMs in your AHV HPOC/SPOC cluster using Terraform infrastructure as code
- Install OCP Cluster in Red Hat Console
OCP Assisted Installation
Pre-requisites
AHV Networking
We will first find two IPs for OCP api and apps ingress endpoints in our network and add it to the Primary IPAM network blacklist.
Find the CIDR range for your Primary IPAM network either from RX or from your instrutor
Logon to your UserXX-LinuxToolsVM (deployed on the HPOC cluster) using Mac Terminal or Windows Putty
Username: root
Password: nutanix default
Prepare the UserXX-LinuxToolsVM
yum update -y
yum install -y bind-utils nmap
Find two unused static IP addresses
nmap -v -sn <your CIDR>Sample commandnmap -v -sn 10.38.18.192/26Logon to any CVM in your cluster and execute the following to add chosen static IPs to the Primary IPAM network
- Username: nutanix
- Password: your cluster password
acli net.add_to_ip_blacklist <your-ipam-ahv-network> ip_list=10.38.18.219,10.38.18.220Sample commandacli net.add_to_ip_blacklist Primary ip_list=10.38.18.219,10.38.18.220
Add DNS Records
In this section we will add PC, API and APPS Ingress DNS records for lookup by OCP IPI installer.
Your OCP cluster's name becomes a subdomain in your DNS zone ntnxlab.local. All OCP cluster related lookups are located within subdomain.
- Main domain -
ntnxlab.local(this gets created with your HPOC reservation)- Sub domain -
ocpuserXX.ntnxlab.local(e.g. ocpuser01, ocpuser02, etc, is your OCP cluster's name)
- Sub domain -
Logon to the AutoAD windows VM
Username: administrator
Password: default
We will add the following entries to DNS server using the two consecutive IPs you found in the previous section
Use your assigned HPOC cluster's IP AddressesThe IP addresses in the following commands are used as an example. You should use IP address details that belong to your HPOC cluster.
For information on locating your cluster IP see Lookup website.
Open PowerShell as Administrator and create the two A records
- Template commands
- Sample commands
Add the API A record - use your own subdomainAdd-DnsServerResourceRecordA -Name api.<ocpuserXX> -IPv4Address <your API IP> -ZoneName ntnxlab.local -ZoneScope ntnxlab.localAdd the apps Ingress A record - use your own subdomainAdd-DnsServerResourceRecordA -Name *.apps.<ocpuserXX> -IPv4Address <your Ingress IP> -ZoneName ntnxlab.local -ZoneScope ntnxlab.localAdd the Prism Central A recordAdd-DnsServerResourceRecordA -Name pc -IPv4Address <your PC IP> -ZoneName ntnxlab.local -ZoneScope ntnxlab.localAdd the Prism Central A recordAdd-DnsServerResourceRecordA -Name pc -IPv4Address 10.38.18.201 -ZoneName ntnxlab.local -ZoneScope ntnxlab.localTest name resolution for added entries
nslookup api.ocpuser01.ntnxlab.local
Server: dc.ntnxlab.local
Address: 10.38.18.203

Name: api.ocpuser01.ntnxlab.local
Address: 10.38.18.219
nslookup myapp.apps.ocpuser01.ntnxlab.local
Server: dc.ntnxlab.local
Address: 10.38.18.203
Name: myapp.apps.ocpuser01.ntnxlab.local
Address: 10.38.18.220nslookup pc.ntnxlab.local
Server: dc.ntnxlab.local
Address: 10.38.18.203
Name: pc.ntnxlab.local
Address: 10.38.3.201
Provision OCP Cluster in Red Hat Console
Go to Red Hat Console
Click on Create new assisted cluster
Fill in the following details:
- Cluster name - ocpuserXX (e.g. ocpuser01)
- Base domain - ntnxlab.local
- OpenShift version - 4.12.15
- CPU Architecture - x86_64
Click on Next
Click on Next in the Operators page
Click on Add Host
In the Add Host pop-up window select Minimal image file: Provision with virtual media
In the SSH public key text box provide the public key
Instructions to create SSH key pair
Logon to your UserXX-LinuxToolsVM
Username: root
Password: nutanix default
ssh-keygen -t rsa -b 2048 -f ~/.ssh/ocp   # << accept all default answers
ls -l ~/.ssh/
## Output here
~/.ssh/ocp.pub
~/.ssh/ocp      # << use this private key in the blueprints
Make sure to copy and paste the public key (
ocp.pub)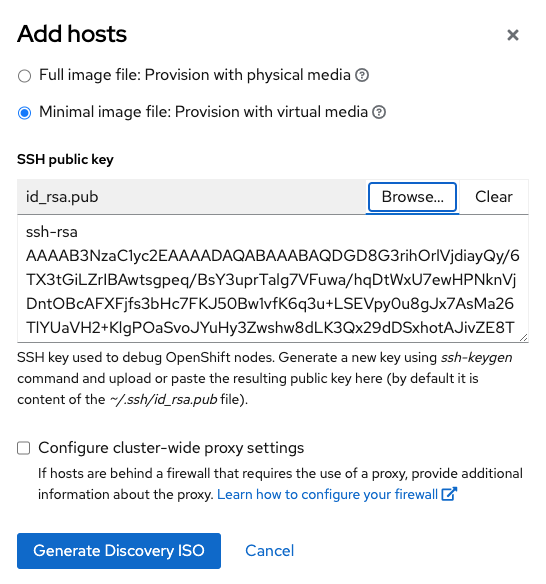
Click on Generate Discovery ISO
Copy the Discovery ISO URL and note it down somewhere. You will need this for your next section while creating infrastructure.
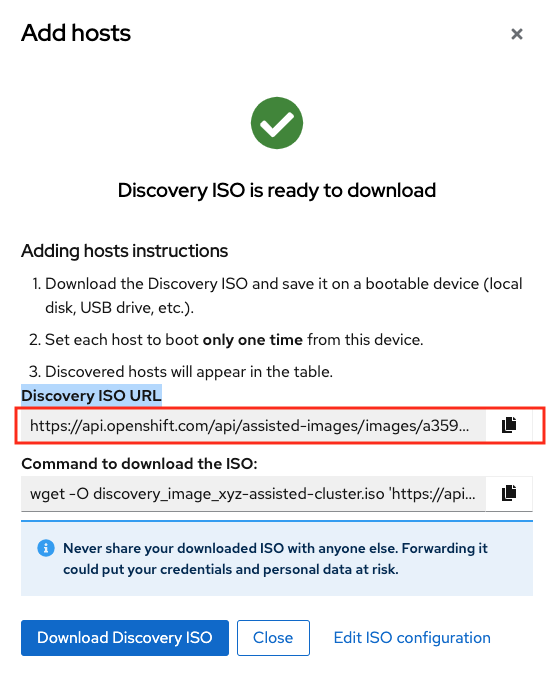
Click on Close
Provision OCP Infrastructure
This section of the lab is done on using Linux Tools VM.
If it is not already present in your HPOC, create Linux Tools VM using instructions in create Linux Tools VM lab.
You are able to create these VMs and its resources using the Prism Element GUI. But in this section we will use Terraform code for repeatability and ease.
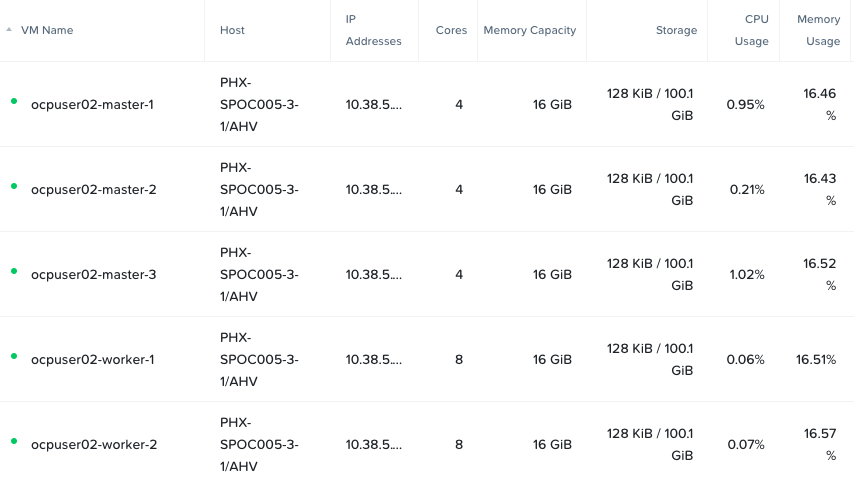
We will create the following resources:
| OCP Role | Operating System | vCPU | RAM | Storage | IOPS |
|---|---|---|---|---|---|
| Master x 3 | RHCOS | 4 | 16 GB | 100 GB | 300 |
| Worker x 2 | RHCOS, RHEL 7.9, or RHEL 8.4 | 8 | 16 GB | 100 GB | 300 |
Login to the Linux Tools VM using the following credentials
- Username - root
- Password - nutanix default
Run the following commands in sequence
yum update -y
yum install -y yum-utils
yum-config-manager --add-repo https://rpm.releases.hashicorp.com/RHEL/hashicorp.repo
yum -y install terraform
yum -y install git
Clone the following git repo and initialise Terraform provider
git clone https://github.com/nutanix-japan/tf-ocp-infra
cd tf-ocp-infra
alias "tf=terraform"
tf init
Get your variables file ready with your HPOC/SPOC environment information
cp terraform.tfvars.sample terraform.tfvarsModify your variables to suit your HPOC environment using
viornanoeditorvi terraform.tfvars- Template file
- Sample file
cluster_name        = "Prism Element Name" # << Change this
subnet_name         = "Primary"
user                = "admin"
password            = "XXXXXXX"           # << Change this
endpoint            = "Prism Element IP"  # << Change this
vm_worker_prefix    = "ocpuserXX-worker"        # << Change xyz to your initials
vm_master_prefix    = "ocpuserXX-master"        # << Change xyz to your initials
vm_domain           = "ntnxlab.local"
vm_master_count     = 3
vm_worker_count     = 2
image_uri           = "Discover ISO URL you copied earlier" # << Change this
cluster_name = "PHX-POC2xx"
subnet_name = "Primary"
user = "admin"
password = "xxxxx"
endpoint = "10.x.x.x"
vm_worker_prefix = "ocpuser01-worker"
vm_master_prefix = "ocpuser01-master"
vm_domain = "ntnxlab.local"
vm_master_count = 3
vm_worker_count = 2
image_uri = "https://api.openshift.com/api/assisted-images/images/78...."Validate and run your Terraform code
tf validate

# if there are any validate errors fix or request support from your instructor
tf apply
# Terraform will show you all resources that it will to create
# Type yes to confirm# Sample output for the command above
Terraform will perform the actions described above.
Only 'yes' will be accepted to approve.
Enter a value: yes
nutanix_image.RHCOS: Creating...
nutanix_image.RHCOS: Still creating... [10s elapsed]
nutanix_image.RHCOS: Creation complete after 14s [id=e04cff4e-a6cf-45f9-890d-96097c4b53ed]
nutanix_virtual_machine.RHCOS-master[0]: Creating...
nutanix_virtual_machine.RHCOS-master[1]: Creating...
nutanix_virtual_machine.RHCOS-worker[0]: Creating...
nutanix_virtual_machine.RHCOS-master[2]: Creating...
nutanix_virtual_machine.RHCOS-worker[1]: Creating...
nutanix_virtual_machine.RHCOS-master[0]: Still creating... [10s elapsed]
nutanix_virtual_machine.RHCOS-master[1]: Still creating... [10s elapsed]
nutanix_virtual_machine.RHCOS-master[2]: Still creating... [10s elapsed]
nutanix_virtual_machine.RHCOS-worker[0]: Still creating... [10s elapsed]
nutanix_virtual_machine.RHCOS-worker[1]: Still creating... [10s elapsed]
nutanix_virtual_machine.RHCOS-master[0]: Creation complete after 16s [id=3a88a3d7-304e-4284-886d-f7882764d7cc]
nutanix_virtual_machine.RHCOS-master[2]: Creation complete after 17s [id=5e87599a-5643-465d-9870-5b34751b2158]
nutanix_virtual_machine.RHCOS-worker[0]: Creation complete after 17s [id=78fb2e69-fee7-4244-ae5c-55ffbc1da21d]
nutanix_virtual_machine.RHCOS-master[1]: Creation complete after 17s [id=7775b527-fc55-4cac-aabc-a024ea4938c1]
nutanix_virtual_machine.RHCOS-worker[1]: Creation complete after 17s [id=c9801a82-a7e3-444e-a206-d5e3e3a75bb1]
Apply complete! Resources: 6 added, 0 changed, 0 destroyed.Run the Terraform state list command to verify what resrouces are created
tf state list# Sample output for the command above
data.nutanix_cluster.cluster # < This is your existing Prism Element HPOC/SPOC cluster
data.nutanix_subnet.subnet # < This is your existing Primary subnet
nutanix_image.RHCOS # < This is OCP Discovery ISO image
nutanix_virtual_machine.RHCOS-master[0] # < This is master vm 1
nutanix_virtual_machine.RHCOS-master[1] # < This is master vm 2
nutanix_virtual_machine.RHCOS-master[2] # < This is master vm 3
nutanix_virtual_machine.RHCOS-worker[0] # < This is worker vm 1
nutanix_virtual_machine.RHCOS-worker[1] # < This is worker vm 2Login to Prism Element > VM and verify the VMs and if they are powered on
Install OCP Cluster in Red Hat Console
In this section we will use Red Hat Console's Assisted Installer wizard to install the OCP cluster with the VMs we have provisioned.
Return to Red Hat Openshift Console and check if the VMs appear (this may take up to 5 minutes)
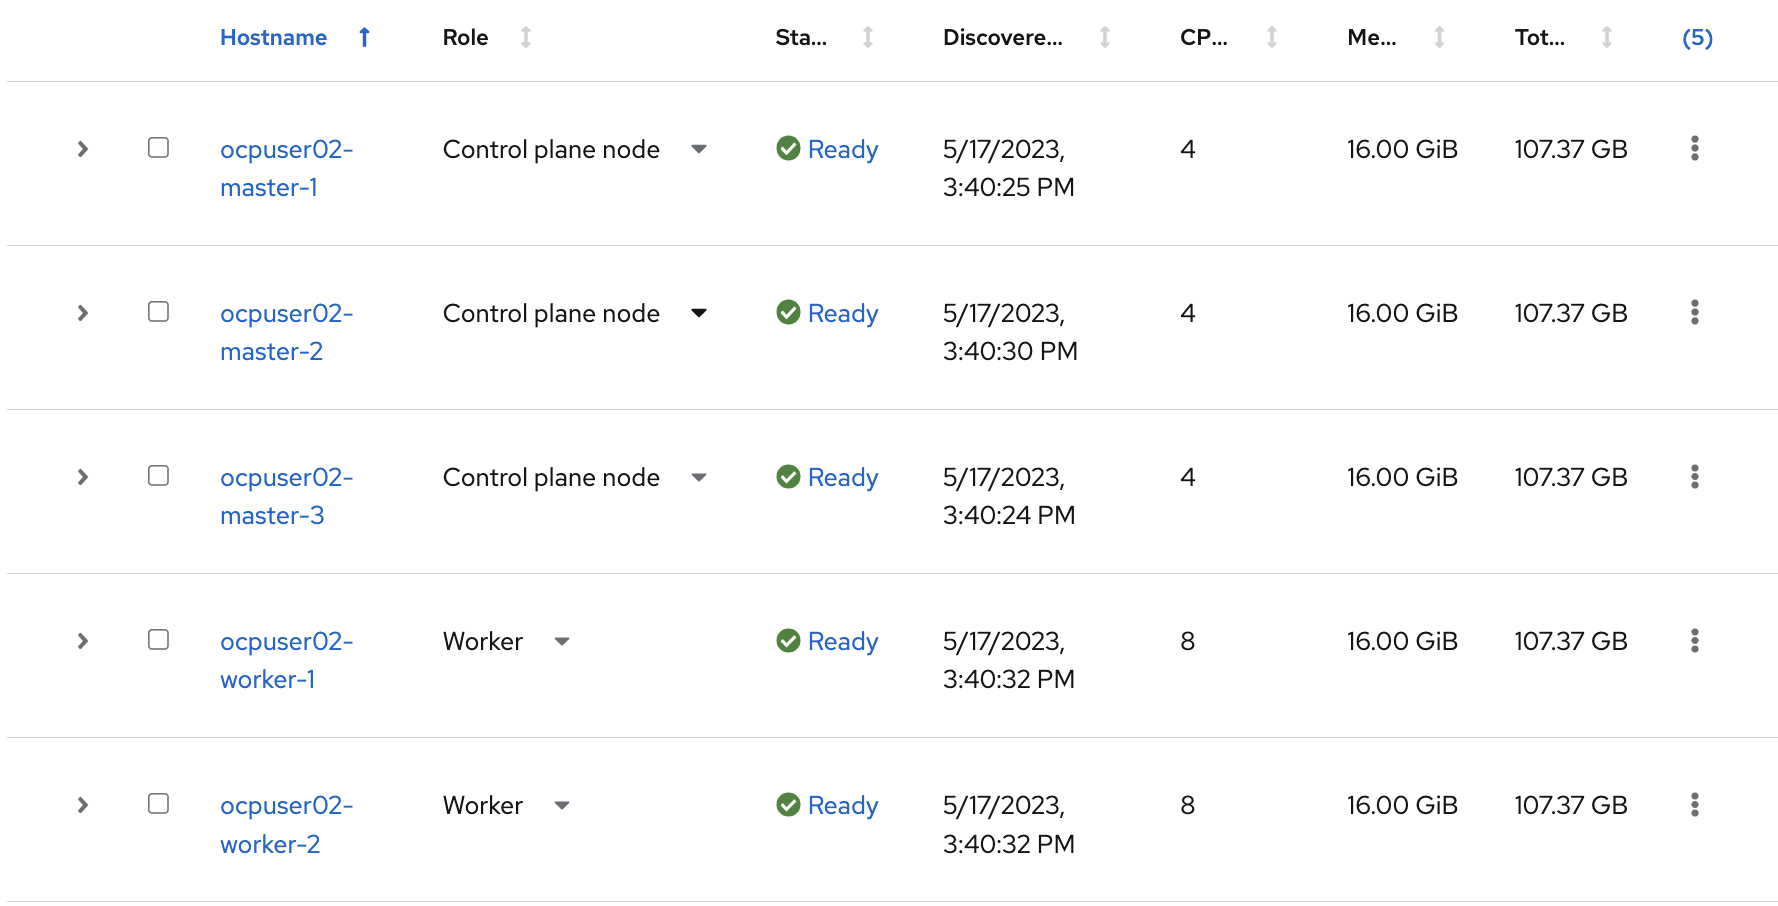
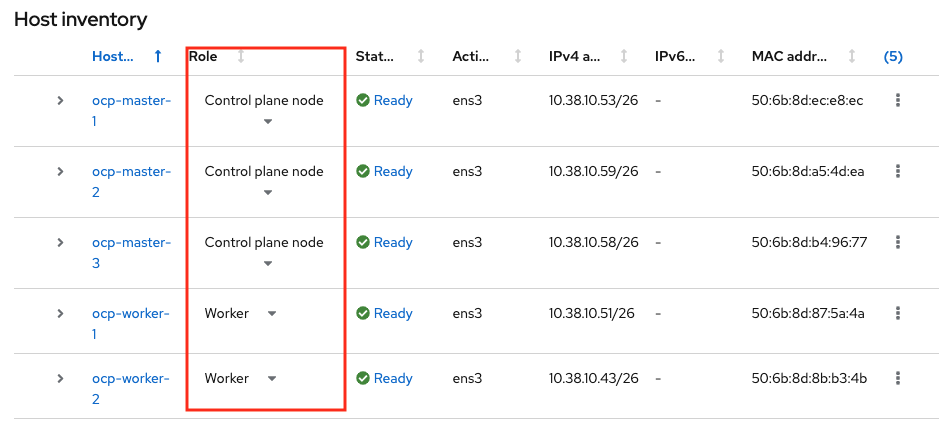
In the Host inventory section, choose the following:
- Control Plane Node for Master VMs (the 3 Master VMs) and
- Worker nodes for Worker VMs from the drop-down menu (the 2 Worker VMs)
Click Next at the bottom of the page
In the Storage section, after confirming disk size, click Next at the bottom of the page
In the Networking section, choose Open Virtual Networking (OVN)
Assign IPs for your API Virtual IP and Ingress Virtual IP from you HPOC/SPOC Primary network pool that you reserved earlier in the AHV Networking section.
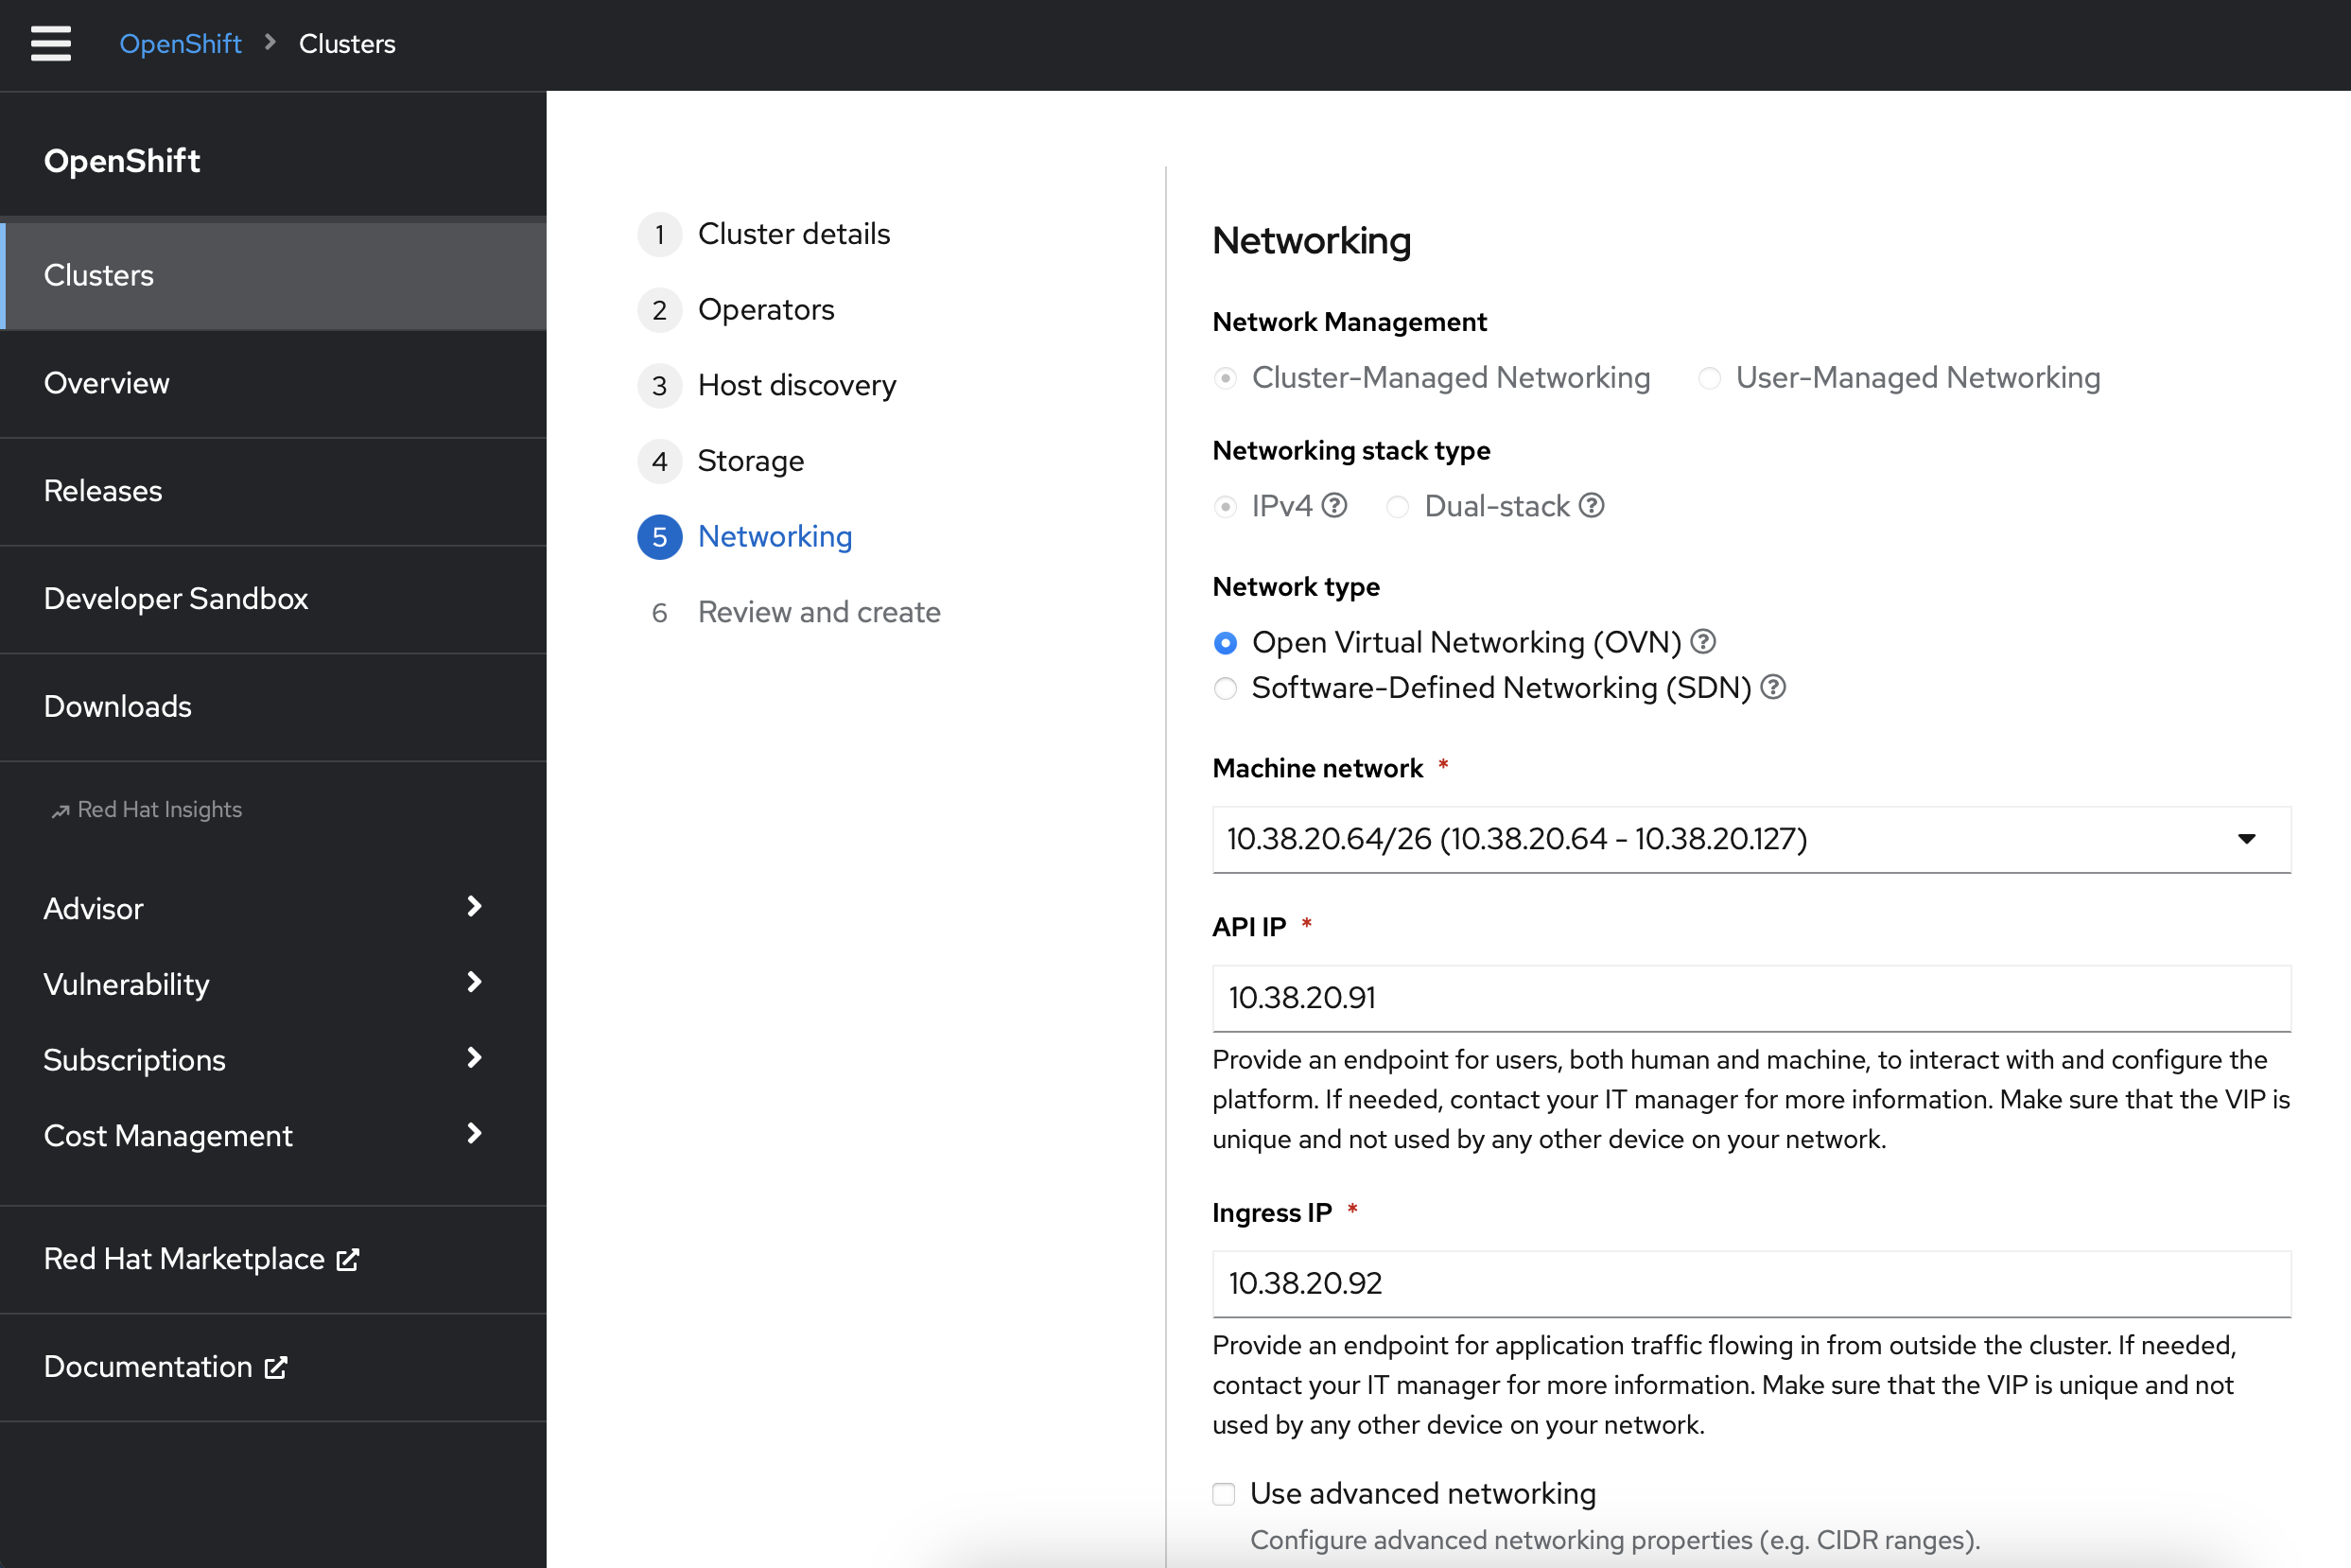
Click Next at the bottom of the page
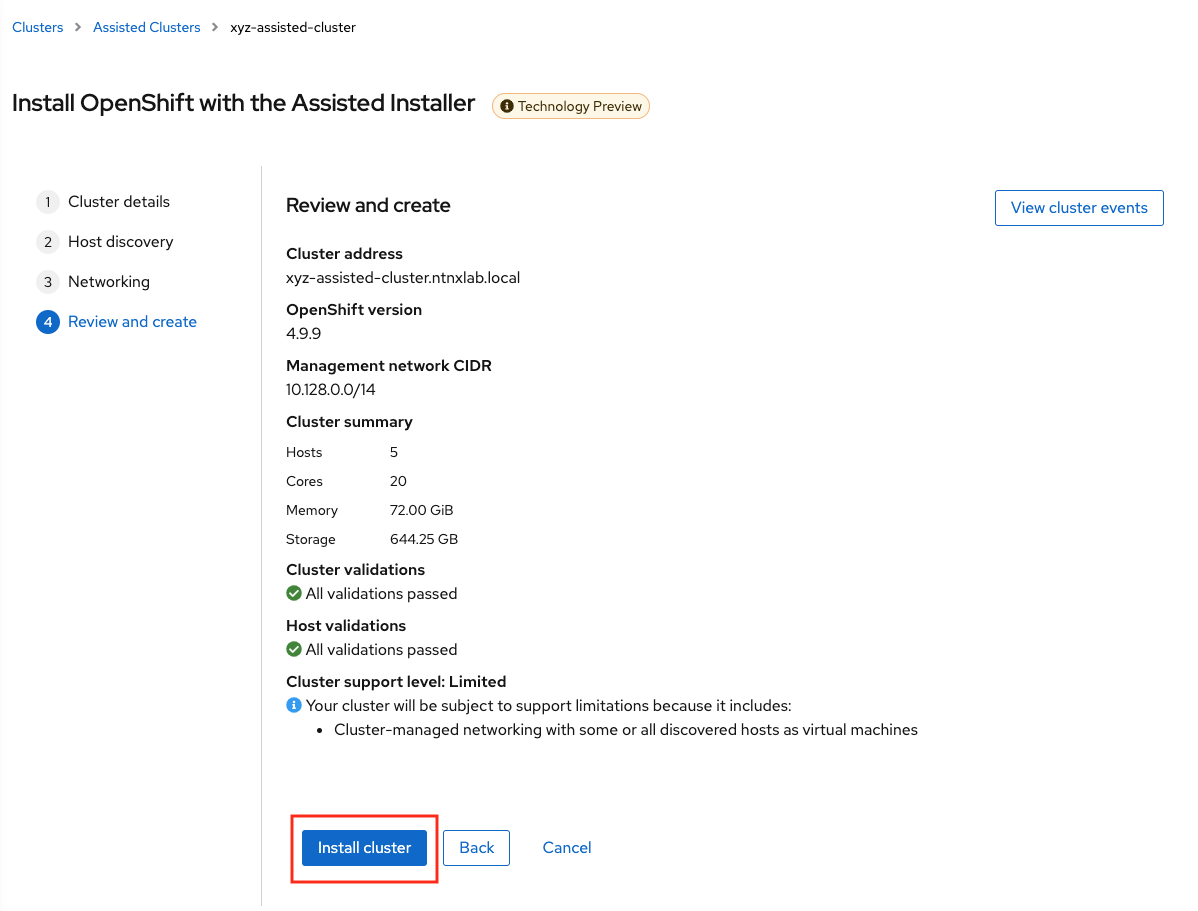
Review your setup information and click on Install Cluster
You will be taken to monitoring your installation progress
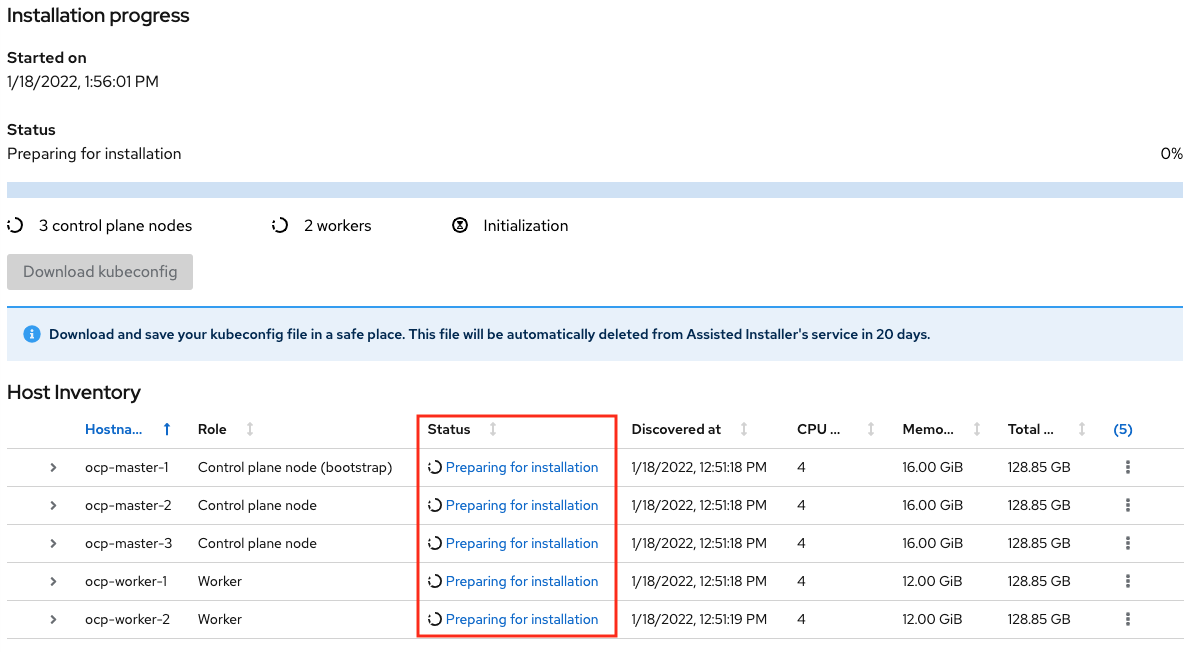
Now the cluster deploy will proceed
Watch for any messages about user interactions in the progress page
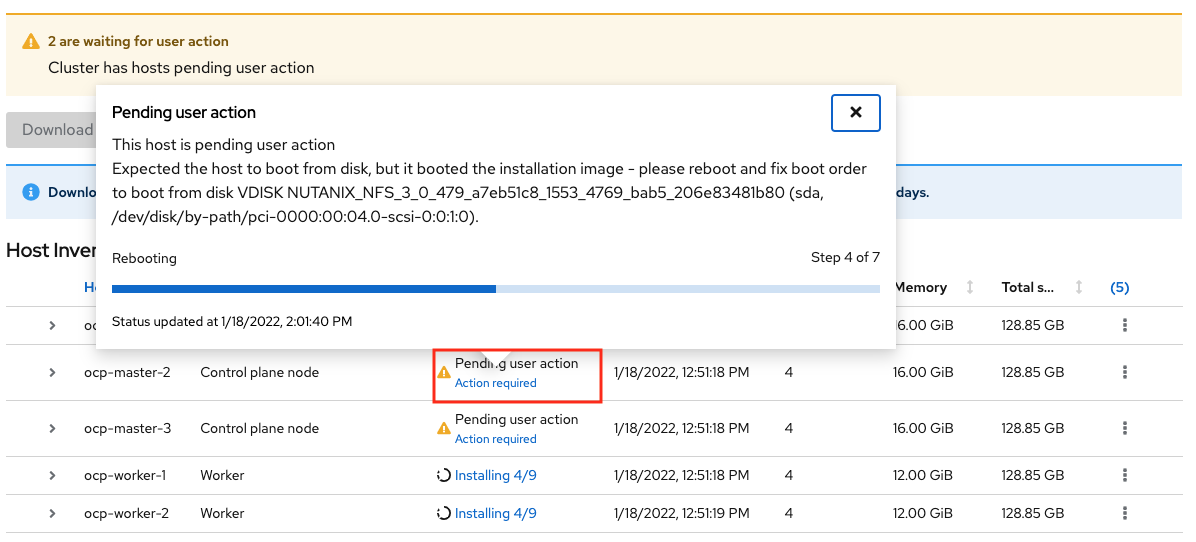
This message is wanting the user to unmount the installation Discovery ISO so they VM can boot into the OS drive
Go to Prism Element > VM > Master/Worker VM > update
Under Disks > Click on Eject
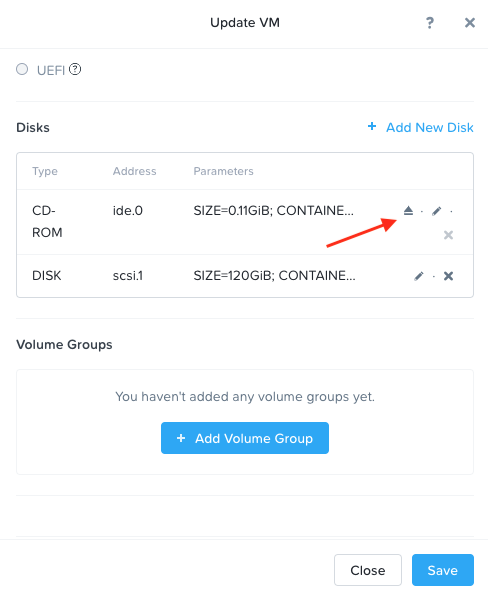
Click on Save
Under Power Off Actions choose to Guest Reboot the VM where there are pending user action
Repeat ejecting CD-ROM for all VMs and rebooting it as the Wizard prompts for user action (do not do this before the prompting)
Once all the user actions are sustained for Master and Worker VMs, OCP cluster will be installed
Make sure to do the following:
- Download
kubeconfigfile - Note down kubeadmin user
password - Note down the URL of the installed OCP cluster
URL
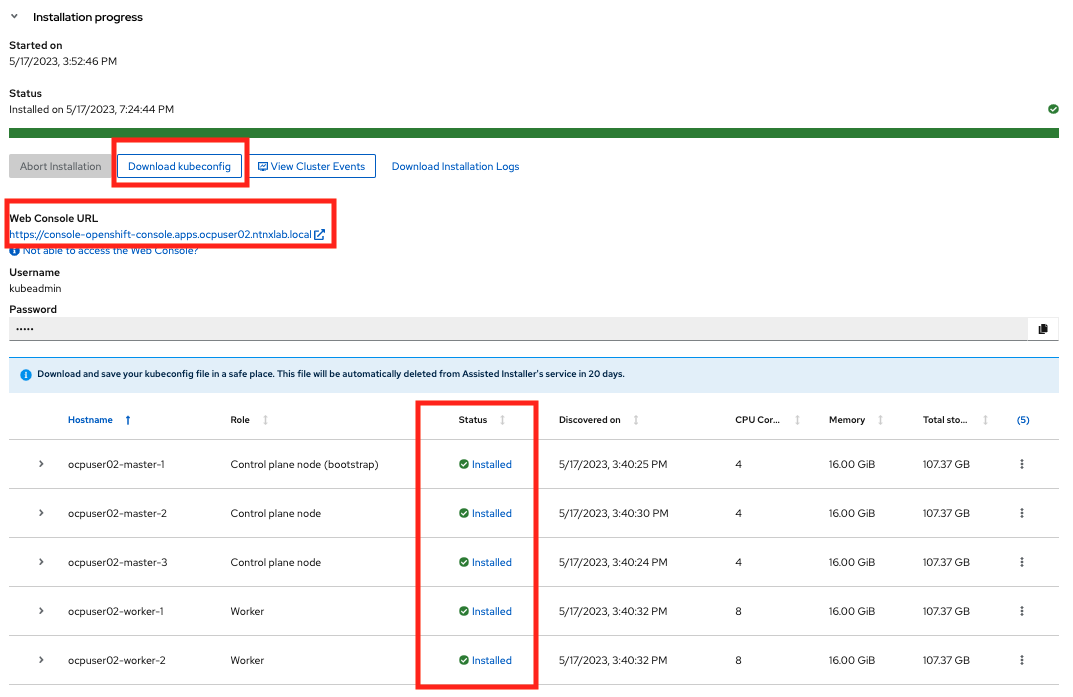 note
noteThis ocp cluster console URL can only be accessed within your HPOC/SPOC environment
- Download
Copy/
scpthe contents ofkubeconfigfile to your UserXX-LinuxToolsVMDownload and install oc commandcurl -LO https://mirror.openshift.com/pub/openshift-v4/x86_64/clients/ocp/stable/openshift-client-linux.tar.gz
tar xvfz openshift-client-linux.tar.gz
cp oc kubectl /usr/local/bin/export KUBECONFIG=/path/to/kubeconfig-file
oc get nodes
# You are all set
You have successfully deployed a OCP cluster using Red Hat Console Assisted Installer.
Takeaways
You can easily deploy multinode/single node OCP cluster using the Red Hat console
You can provision resoruces (VM, Storage, etc) on Nutanix using Terraform IaaC (GitOps)
infoThe Installer Provisioned Installer (IPI) also uses Terraform to deploy infrastructure assets (VM) on Nutanix and VMware
Assisted Installer provisioned OCP clusters can be used as a learning ground and for testing purposes
Now that you have finished Assisted install, you can move on to the OCP Command Access section and then on to workloads section.